Method 1 |
Method 2 |
| Figure 1
|
Figure 2
|
One of the requirements
that keeps cropping up on just about every single application development
project is the ability to create a record from an existing one. In other
words, users like to bring up an existing record, modify a few things about
it and save it as a new record. This functionality provides great time
savings for them. In Oracle Forms, they would simply use <duplicate
record>. In WebServer modules generated by Designer 2.1.2 there is no provision
for this. This is the second part of a 2 part article. It will show you
Method 2: another technique to achieve this record cloning with Designer.
Even if you were perfectly content with Method 1, do read on. This second
technique will demonstrate mechanisms that can be applied to a number of
web generation challenges.
Method 1 |
Method 2 |
| Figure 1
|
Figure 2
|
Method 1 was HTML and JavaScript intensive, but required no additional PL/SQL. Method 2 requires very little HTML, no JavaScript and one PL/SQL procedure to be added to the module definition. Method 2 also involves a PERL pre-compiler to automate modifications to the PL/SQL code generated by Designer. This is a very powerful trick that can be applied every time that you cannot get what you want from Designer.
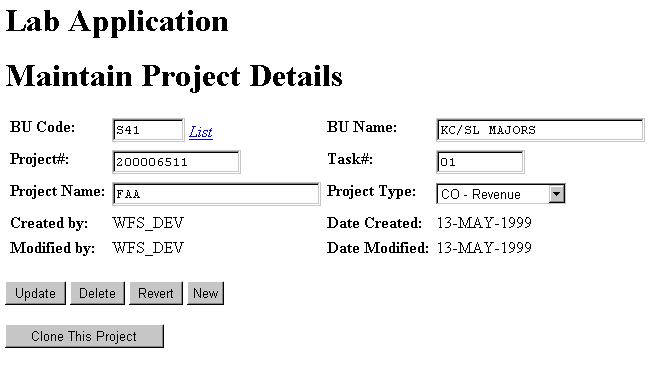
We chose a simple form to illustrate
record cloning in order to make this article simpler and shorter. In the
real world, the typical module that requires cloning is usually composed
of many more fields than our simple project module. But this is good enough
to illustrate the principle.
http://hdd.server.com/hddagent/plsql/prj_mw$.startup
This URL calls PL/SQL procedure startup that belongs to package prj_mw$. Startup calls a number of PL/SQL routines that may or may not contribute to what is displayed in the browser. We need to find the procedure that constructs the record list. Knowing how. to dig through the code generated by Designer is a very useful skill that you will put to use very often. So we will show you every step of the investigation. For the sake of keeping this article reasonably short (sic), we can only show extracts of the code. Our "simple" module resulted in 2754 lines of PL/SQL code generated by Designer. Aren't you glad that you don't have to code this manually?
Let us begin the investigation.
Listing A shows the relevant parts of procedure startup.
prj_mw$.startup calls prj_mw$prj_mw.startup.
Is that the one that displays the record list? Let's find out in Listing
B.
Listing B shows that we are getting closer. Still no code constructing
a web page though, but ActionQuery carries the name of a procedure that
actually does something. Let us look at it in Listing C.
L_BUTCHK varchar2(100):= null;
begin
[...]
if (Z_ACTION = QF_INSERT_BUT_ACTION) or (Z_ACTION
= QF_INSERT_BUT_CAPTION) then
L_BUTCHK :=QF_INSERT_BUT_ACTION;
end if;
QueryList(
P_L_BU_PC_CODE,
P_L_BU_BU_NAME,
P_PRJ_NBR,
P_TASK_NBR,
P_NAME,
null, L_BUTCHK, Z_DIRECT_CALL=>TRUE);
[...]
end;
Still no web page construction.
But the next listing will have it: procedure QueryList is our final destination.
It is a rather long procedure, so I have trimmed it a little bit:
[... declarations cut here]
begin
[... code cut here]
for i in 1..RL_NUMBER_OF_COLUMNS
loop
WSGL.LayoutHeader(15,
'LEFT', 'Project#');
WSGL.LayoutHeader(10,
'LEFT', 'Task#');
WSGL.LayoutHeader(25,
'LEFT', 'Project Name');
end loop;
WSGL.LayoutRowEnd;
while I_ROWS_FETCHED
<> 0 loop
if I_TOTAL_ROWS >= I_START then
dbms_sql.column_value(I_CURSOR, 1, CURR_VAL.PRJ_NBR);
dbms_sql.column_value(I_CURSOR, 2, CURR_VAL.TASK_NBR);
dbms_sql.column_value(I_CURSOR, 3, CURR_VAL.ID);
dbms_sql.column_value(I_CURSOR, 4, CURR_VAL.NAME);
L_CHECKSUM := to_char(WSGL.Checksum(''||CURR_VAL.ID));
WSGL.LayoutRowStart('TOP');
WSGL.LayoutData(htf.anchor2('prj_mw$prj_mw.queryview?P_ID='||CURR_VAL.ID||'&Z_CHK='||L_CHECKSUM,
CURR_VAL.PRJ_NBR, ctarget=>L_VF_FRAME));
WSGL.LayoutData(CURR_VAL.TASK_NBR);
WSGL.LayoutData(CURR_VAL.NAME);
WSGL.LayoutRowEnd;
I_ROWS_FETCHED := dbms_sql.fetch_rows(I_CURSOR);
if I_TOTAL_ROWS = I_START + RL_RECORD_SET_SIZE - 1 then
if I_ROWS_FETCHED <> 0 then
I_NEXT_BUT := TRUE;
end if;
exit;
end if;
else
I_ROWS_FETCHED := dbms_sql.fetch_rows(I_CURSOR);
end if;
I_TOTAL_ROWS := I_TOTAL_ROWS + I_ROWS_FETCHED;
end loop;
WSGL.LayoutClose;
[...code cut here]
end;
The problem is: how do we generate this? Well, to the best of the author's knowledge, there is no way to tell Designer to do this. When confronted with such a requirement, most people would generate as much as they can from Designer and make manual modifications to the code. This works, but as soon as the module is generated again from Designer, the manual modifications are lost. We can keep a log of manual modifications and re-apply them each time we need to generate the module again. This is very time consuming and prone to errors. We can also chose to never generate again from Designer once manual modifications are made. This choice costs a lot of project time if the module design or database design change.
What we need is a tool that makes automatic modifications to the code generated by Designer. The author could not find such tool so he built one and sends it to anybody who wants it, source code and manual included. The tool is a simple pre-compiler written in PERL to extend the functionality of web modules generated from Oracle Designer 2.1.2. It integrates seamlessly with Oracle Designer, SQL*Plus and any browser you may want to use to display your modules. It provides a method that is less overall time consuming and the less prone to error than manual modifications to thousands of lines of PL/SQL code. You will need to make each modification manually once, make sure that it works and then script it in the Pre-compiler, a bit like you would write a macro in a word processor.
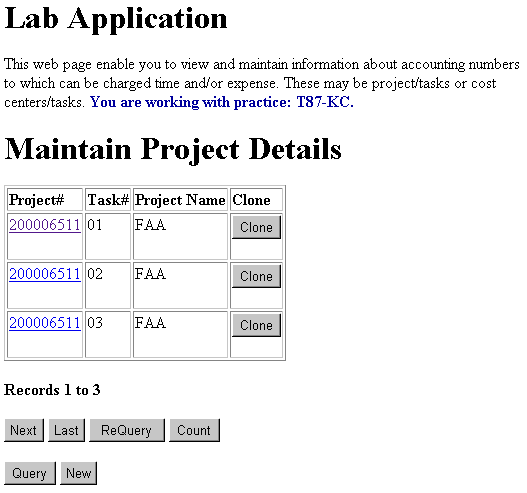
In order to add one column to the HTML table that lists records we need to add two lines of PL/SQL code to the procedure QueryList:
[... declarations cut here]
begin
[... code cut here]
WSGL.LayoutOpen(WSGL.LAYOUT_TABLE,
P_BORDER=>TRUE);
WSGL.LayoutRowStart;
for i in 1..RL_NUMBER_OF_COLUMNS
loop
WSGL.LayoutHeader(15,
'LEFT', 'Project#');
WSGL.LayoutHeader(10,
'LEFT', 'Task#');
WSGL.LayoutHeader(25,
'LEFT', 'Project Name');
WSGL.LayoutHeader(25,
'LEFT', 'Clone');
end loop;
WSGL.LayoutRowEnd;
while I_ROWS_FETCHED <> 0 loop
if I_TOTAL_ROWS >= I_START then
dbms_sql.column_value(I_CURSOR, 1, CURR_VAL.PRJ_NBR);
dbms_sql.column_value(I_CURSOR, 2, CURR_VAL.TASK_NBR);
dbms_sql.column_value(I_CURSOR, 3, CURR_VAL.ID);
dbms_sql.column_value(I_CURSOR, 4, CURR_VAL.NAME);
L_CHECKSUM := to_char(WSGL.Checksum(''||CURR_VAL.ID));
WSGL.LayoutRowStart('TOP');
WSGL.LayoutData(htf.anchor2('prj_mw$prj_mw.queryview?P_ID='||CURR_VAL.ID||'&Z_CHK='||L_CHECKSUM,
CURR_VAL.PRJ_NBR, ctarget=>L_VF_FRAME));
WSGL.LayoutData(CURR_VAL.TASK_NBR);
WSGL.LayoutData(CURR_VAL.NAME);
WSGL.LayoutData('<FORM
ACTION="prj_mw$prj_mw.clone" METHOD="POST"><INPUT TYPE="hidden" NAME="P_ID"
VALUE="'||CURR_VAL.ID||'"><INPUT TYPE="Submit" VALUE="Clone"></FORM>');
WSGL.LayoutRowEnd;
[...code cut here]
end;
The concept is pretty simple.
As you can see in the second underlined statement in listing E, the clone
button is wrapped in an HTML form that calls procedure clone in package
prj_mw$prj_mw. This technique was explained in detail in part 1 of this
article. Procedure prj_mw$prj_mw.clone does not exist yet. We will show
you later how to include it into the prj_mw module component definition
in Designer.
For module specific modifications,
the pre-compiler expects a .pca file that has the same file name as the
DDL file generated by Designer to create the Web Server module. For our
module, this file name is CVWPRJ_MW.pca. Listing F shows the content of
this file.
&SimpleSearchRepRange($myStart, $myEnd, $mySearch, $myReplace);
$myStart = 'prj_mw$prj_mw.QueryList';
$myEnd = '^ WSGL.ClosePageBody;';
$mySearch = '^
WSGL.LayoutData(CURR_VAL.NAME);';
$myReplace = '
WSGL.LayoutData(CURR_VAL.NAME);'."\n".
'
WSGL.LayoutData(\'<FORM ACTION="prj_mw$prj_mw.clone" METHOD="POST"><INPUT
TYPE="hidden" NAME="P_ID" VALUE="\'||CURR_VAL.ID||\'"><INPUT TYPE="Submit"
VALUE="Clone"></FORM>\');'."\n";
&SimpleSearchRepRange($myStart, $myEnd, $mySearch, $myReplace);
The code in Listing F is
written in PERL. There is very little to it:
&SimpleSearchRepRange requires 4 parameters:
-- Create a new project
insert into wfs_projects (prj_nbr, task_nbr, name, prj_type,
bu_id) values (
v_prj_row.prj_nbr,
'-10',
v_prj_row.name,
v_prj_row.prj_type,
v_prj_row.bu_id
);
-- Display the result
select id
into v_prj_row.id
from wfs_projects
where prj_nbr = v_prj_row.prj_nbr and
task_nbr = '-10';
prj_mw$prj_mw.queryview(p_id=>v_prj_row.id, z_direct_call=>true);
end;

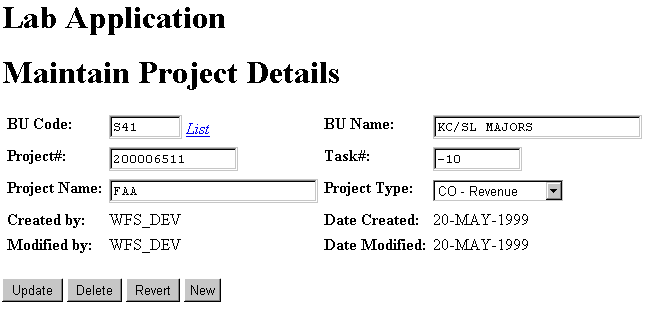
We now have all the elements
required for the cloning. So we generate the Web Server module and tell
Designer to run the pre-compiler. The latter will install the packages
with SQL*Plus and even display the module in your browser. Figure 4 illustrates
the web page presented to users after they click on the clone button.
A quick note about the value
of good database design: did you notice the one parameter that we pass
to prj_mw$prj_mw.clone: P_ID? This is the primary key of the table projects.
We use a database sequence to populate this key. The users never see its
value. We don't even have to worry about it in our insert statement in
Listing G: the table API does it for us. Having a surrogate key makes it
possible for users to update project names and task numbers. It also makes
it easy for developers to designate records in web forms. Without it we
would have had to double the length of our code for the HTML form. For
the adepts of using business data to compose primary keys, here is the
HTML that would be required instead of just one line:
<INPUT TYPE=\"hidden\" NAME=\"P_PRJ_NBR\"
VALUE=\"'||CURR_VAL.PRJ_NBR||'\">
<INPUT TYPE=\"hidden\" NAME=\"P_TASK_NBR\"
VALUE=\"'||CURR_VAL.TASK_NBR||'\">.
In this 2-part article we showed you 2 techniques to enable users to clone records. They may very well be other ways or variants to do it. We considered it important to show you both techniques because they both employ mechanisms that can resolve virtually all web development problems that you may encounter. We covered a lot of technical knowledge in this article, including 3 languages: PERL, JavaScript and HTML. If you intend to focus on web development you will need to become proficient in each of these languages.
Hervé Deschamps is a Senior Principal Consultant
with Oracle Corporation. He has had over five years of experience with
Oracle Development Environments (Designer, Developer and previous versions).
He has an extensive experience of all phases of the development life cycle
with a focus in the areas of business analysis, data modeling and database
design. He is also known in the technical community for his article publications
centered around best custom development practices and for his user group
presentations. You can reach him by e-mail at hdescham@us.oracle.com. He
also maintains a web site full of articles, scripts, tips and techniques
at http://www.iherve.com.